

こんにちはKIYONOエンジニアです。
本日はこちらのチュートリアルを解説してみました。
Dataflowを勉強するには良い題材なのですが、英語なのと説明もそこまで丁寧ではないので本記事にてわかりやすく解説できたらと思っています。
Dataflowはデータ処理でかなりよく使われてるのでぜひ、一度チュートリアルお試しください。なおDataflowにはテンプレートでPub/SubからBigqueryへのデータ送付する処理等備わっているのですがあえてテンプレートは使わないチュートリアルを選んでいます。実際にDataflowのベースになっているApache Beamを使った方がDataflowの処理がよりわかるので今回はそちらのチュートリアルを取り上げております。
1. チュートリアルの全体像
今回のチュートリアルは至ってシンプルで以下を実装します。
■実装内容
- Pub/Subからデータを読み込む
- Pub/Subからのデータをタイムスタンプ でグループ分け(Window)
- Cloud Storageに処理したデータを書き込む
■概要図

今回の全体像は上図のイメージです。簡単に概要を説明するとCloud ShedulerでPub/Subに対し、定期的にメッセージを送ります。Pub/Subに送られたメッセージをdataflowによって処理した上で最終的にCloud Storageに出力します。
2. 実装
2-1. GCPリソースの準備
Cloud Shellを使って必要なリソースを作成します。以下をCloud Shellのコンソールに入力してください。
PROJECT_ID=$(gcloud config get-value project)
BUCKET_NAME=$PROJECT_ID
TOPIC_ID=my-id
REGION=us-central1
AE_REGION=us-central
BUCKET_NAMEは一意であればなんでも良いですが今回はチュートリアル通りプロジェクトIDをバケット名にしています。またTOPIC_IDも任意のIDで問題ないのですが、一旦チュートリアルに合わせてます。
以下をコンソールに入力してバケットを作成します。この際エラーになる場合は上記のBUCKET_NAMEが一意になるように調整してください。
gsutil mb gs://$BUCKET_NAME次にPub/Subのトピックを作成します。
gcloud pubsub topics create $TOPIC_ID次にCloud Schedulerを使うためにはApp Engineの設定が必要なので以下のコマンドを入力してください。すでにApp Engineがそのプロジェクト内で設定されている場合はエラーになりますので以降の設定に進んでください。
gcloud app create --region=$AE_REGION
次にCloud Schedulerのジョブを以下のコマンドで作成します。
gcloud scheduler jobs create pubsub publisher-job --schedule="* * * * *" \
--topic=$TOPIC_ID --message-body="Hello!"
こちらのジョブの意味としては、publisher-job(別名でも可)というジョブを作成しPub/Subのトピックに対し、”Hello!”という文字列を送っています。また時間間隔は1分間隔の設定で、「* * * * *」で1分間隔を表しています。参考
以下のコマンドでCloud Shedulerを起動します。
ここまででGCPリソースの設定は以上となります。
2-2. Dataflowの準備
Dataflowで使用するコードの準備をします。
まずは以下のコマンドPython関連のイメージをdockerコンテナ内にpullしコンテナ内に入ります。
docker run -it -e DEVSHELL_PROJECT_ID=$DEVSHELL_PROJECT_ID python:3.7 /bin/bash
次にgithubのリポジトリから今回使用するためのサンプルコードをcloneします。
git clone https://github.com/GoogleCloudPlatform/python-docs-samples.git以下のコマンドでディレクトリを変更しApache Beamに必要なモジュールをインストールします。
cd python-docs-samples/pubsub/streaming-analytics
pip install -U -r requirements.txt # Install Apache Beam dependencies
python-docs-samples/pubsub/streaming-analyticsディレクトリの直下にPubSubToGCS.pyというファイルがあるので、今回はこれを使用します。
コードの中身は以下の通りです。
import argparse
from datetime import datetime
import logging
import random
from apache_beam import DoFn, GroupByKey, io, ParDo, Pipeline, PTransform, WindowInto, WithKeys
from apache_beam.options.pipeline_options import PipelineOptions
from apache_beam.transforms.window import FixedWindows
class GroupMessagesByFixedWindows(PTransform):
    """A composite transform that groups Pub/Sub messages based on publish time
    and outputs a list of tuples, each containing a message and its publish time.
    """
    def __init__(self, window_size, num_shards=5):
        # Set window size to 60 seconds.
        self.window_size = int(window_size * 60)
        self.num_shards = num_shards
    def expand(self, pcoll):
        return (
            pcoll
            # Bind window info to each element using element timestamp (or publish time).
            | "Window into fixed intervals"
            >> WindowInto(FixedWindows(self.window_size))
            | "Add timestamp to windowed elements" >> ParDo(AddTimestamp())
            # Assign a random key to each windowed element based on the number of shards.
            | "Add key" >> WithKeys(lambda _: random.randint(0, self.num_shards - 1))
            # Group windowed elements by key. All the elements in the same window must fit
            # memory for this. If not, you need to use `beam.util.BatchElements`.
            | "Group by key" >> GroupByKey()
        )
class AddTimestamp(DoFn):
    def process(self, element, publish_time=DoFn.TimestampParam):
        """Processes each windowed element by extracting the message body and its
        publish time into a tuple.
        """
        yield (
            element.decode("utf-8"),
            datetime.utcfromtimestamp(float(publish_time)).strftime(
                "%Y-%m-%d %H:%M:%S.%f"
            ),
        )
class WriteToGCS(DoFn):
    def __init__(self, output_path):
        self.output_path = output_path
    def process(self, key_value, window=DoFn.WindowParam):
        """Write messages in a batch to Google Cloud Storage."""
        ts_format = "%H:%M"
        window_start = window.start.to_utc_datetime().strftime(ts_format)
        window_end = window.end.to_utc_datetime().strftime(ts_format)
        shard_id, batch = key_value
        filename = "-".join([self.output_path, window_start, window_end, str(shard_id)])
        with io.gcsio.GcsIO().open(filename=filename, mode="w") as f:
            for message_body, publish_time in batch:
                f.write(f"{message_body},{publish_time}\n".encode("utf-8"))
def run(input_topic, output_path, window_size=1.0, num_shards=5, pipeline_args=None):
    # Set `save_main_session` to True so DoFns can access globally imported modules.
    pipeline_options = PipelineOptions(
        pipeline_args, streaming=True, save_main_session=True
    )
    with Pipeline(options=pipeline_options) as pipeline:
        (
            pipeline
            # Because `timestamp_attribute` is unspecified in `ReadFromPubSub`, Beam
            # binds the publish time returned by the Pub/Sub server for each message
            # to the element's timestamp parameter, accessible via `DoFn.TimestampParam`.
            # https://beam.apache.org/releases/pydoc/current/apache_beam.io.gcp.pubsub.html#apache_beam.io.gcp.pubsub.ReadFromPubSub
            | "Read from Pub/Sub" >> io.ReadFromPubSub(topic=input_topic)
            | "Window into" >> GroupMessagesByFixedWindows(window_size, num_shards)
            | "Write to GCS" >> ParDo(WriteToGCS(output_path))
        )
if __name__ == "__main__":
    logging.getLogger().setLevel(logging.INFO)
    parser = argparse.ArgumentParser()
    parser.add_argument(
        "--input_topic",
        help="The Cloud Pub/Sub topic to read from."
        '"projects//topics/".',
    )
    parser.add_argument(
        "--window_size",
        type=float,
        default=1.0,
        help="Output file's window size in minutes.",
    )
    parser.add_argument(
        "--output_path",
        help="Path of the output GCS file including the prefix.",
    )
    parser.add_argument(
        "--num_shards",
        type=int,
        default=5,
        help="Number of shards to use when writing windowed elements to GCS.",
    )
    known_args, pipeline_args = parser.parse_known_args()
    run(
        known_args.input_topic,
        known_args.output_path,
        known_args.window_size,
        known_args.num_shards,
        pipeline_args,
    )
冒頭にも説明しましたが処理をまとめると以下になります。
- Pub/Subからデータを読み込む
- Pub/Subからのデータをタイムスタンプ でグループ分け(Window)
- Cloud Storageに処理したデータを書き込む
2-3. パイプラインを実行
以下のコマンドでパイプラインを実行します。
python PubSubToGCS.py \
    --project={{gcp_project_id}} \
    --region=us-central1 \
    --input_topic=projects/{{gcp_project_id}}/topics/my-id \
    --output_path=gs://{{BUCKET_NAME}}/samples/output \
    --runner=DataflowRunner \
    --window_size=2 \
    --num_shards=2 \
    --temp_location=gs://{{BUCKET_NAME}}/temp
3. 結果の確認
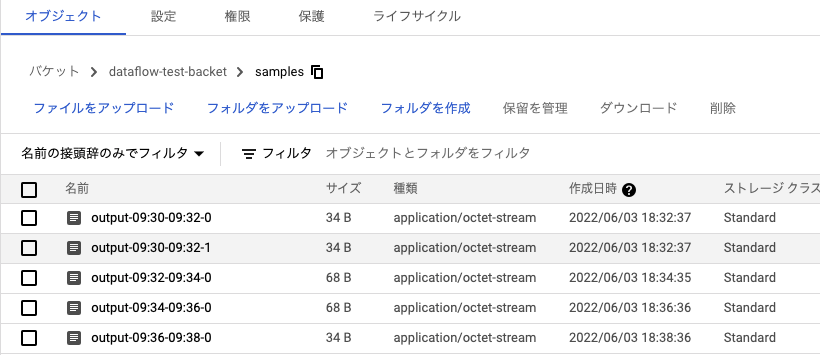
まず最終的な結果としてはCloud Storageの指定したバケットのsmplesというディレクトリにアウトプットというファイルが生成されます。中身は「Hello!,2022-05-21 11:29:00.665000」のようにCloud ShedulerでPub/Subに送ったHello!と先ほどpythonファイルで処理したタイムスタンプ 情報が記載されています。
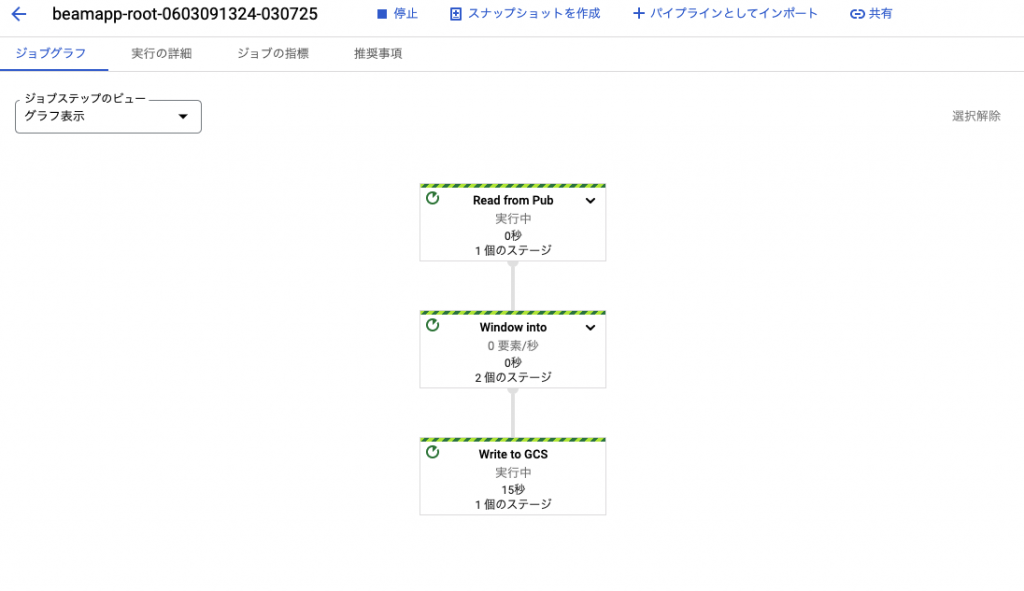
今回のDataflowの処理はGCPのコンソール上で以下のようにパイプラインを確認することができます。

上図がpythonファイルによって追加されたDataflowのジョブで、以下が実際に処理されているパイプラインの中身です。
以上までがチュートリアルでの実装内容です。最後cleanupを忘れないようにしてください。費用がかかってしまいます。
4. 使用したリソースの削除
詳細解説しませんが、以下リソースの削除方法です。GCPコンソールから削除してももちろんOKです。
gcloud scheduler jobs delete publisher-job
gcloud pubsub topics delete $TOPIC_IDgsutil -m rm -rf "gs://${BUCKET_NAME}/samples/output*"
gsutil -m rm -rf "gs://${BUCKET_NAME}/temp/*"
gsutil rb gs://${BUCKET_NAME}5. まとめ
Dataflowはデータ分析でよく使われるリソースであるものの、以外に難しいと感じる方が多いかと思います。
Dataflowを使いたい、またはメンテナンスできないという方はぜひ一度お問い合わせいただければと思います。